
Why one bottle dimension moves three things瓶子的一个尺寸改动,为什么会牵动三件事
A half-millimetre change to a bottle neck touches compatibility, fill accuracy and cap load at the same time.瓶口改半毫米,会同时牵动相容性、灌装精度与旋盖受力。
The most common misunderstanding at the sampling stage is treating a dimension change as nothing more than a number change. On the drawing, moving a bottle neck from 18mm to 18.5mm looks like half a millimetre — but on the production side that half millimetre moves three things at once.
First, the contact area with the formula changes. The internal surface area of the neck determines how much of the formula touches the packaging. For most formulas the difference is negligible. For two categories it is not: products with a high essential-oil content, and products intended for long-term storage. A change in contact area shifts the amount of migration and adsorption, which changes the conclusion of a shelf-life test.
Second, the alignment accuracy at the filling station changes. The filling nozzle locates on the centre of the bottle mouth. When the neck grows or shrinks, the nozzle sits slightly off-centre. The offset may be small, but it is enough to increase splashing or product on the neck wall — which shows up as greater variation in fill weight.
Third, the force distribution at capping changes. A different neck dimension changes the width of the contact band between cap and neck. A wider band spreads the same torque more evenly. A narrower band raises local pressure, which either crushes the gasket or prevents the cap from seating fully. Both present as leakage a few weeks later.
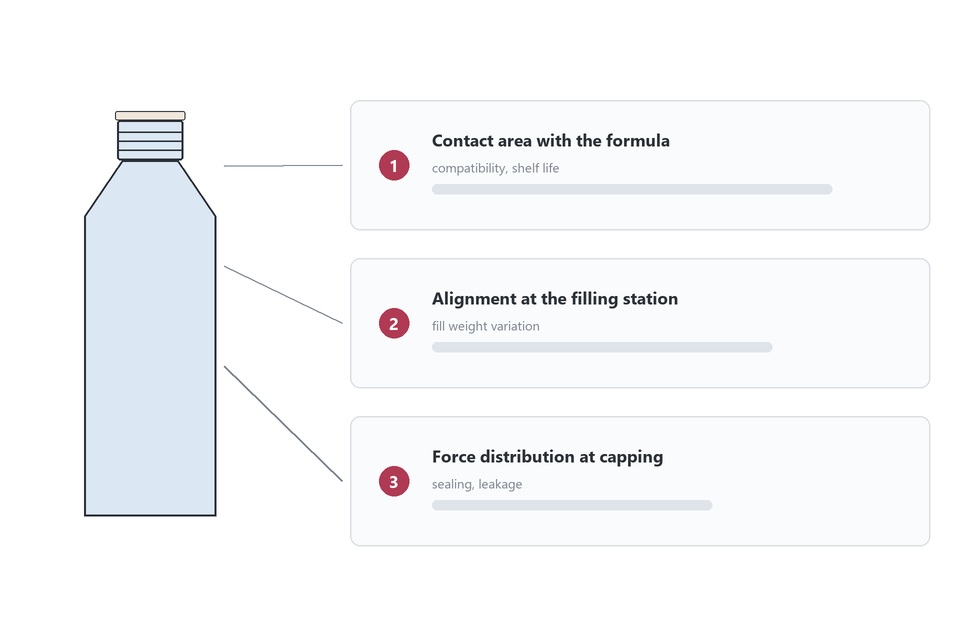
So the real question is not whether a dimension can be changed, but what must be re-checked after changing it. Our internal rule is that any dimension change triggers a review of all three — not just on the drawing, but with an actual run on the filling line.
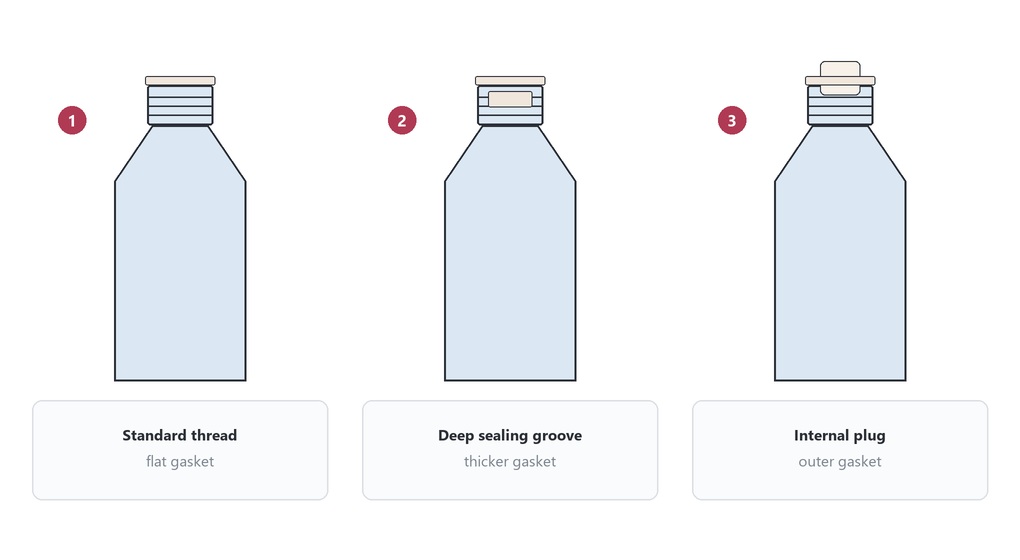
Then there is the sealing structure itself. "Good seal" can be achieved several ways, and they differ in cost, assembly difficulty and fit.
The most basic is a standard thread with a flat gasket. Simple, lowest cost, and adequate where the formula is relatively viscous and the product will not be stored on its side for long.
Where the client knows the product will ship on its side or inverted, a deeper sealing groove is worth considering. It gives the gasket more room to deform under load, so the contact face stays continuous. The trade-off is a more complex neck mould and a higher unit price.
For essential-oil-heavy or low-viscosity products there is a third route: an internal plug plus an outer gasket. The plug interrupts the flow path first, and the outer gasket makes the final seal. Two barriers give a more consistent result, but there is an extra assembly step, and the plug material has to be compatibility-checked against the formula.
None of the three is universally better — it depends on your formula, your shipping method and your cost envelope. We usually suggest trialling two structures in the same sample round, using the same batch of formula, so the results are actually comparable.
The last issue causes more problems than any technical one: the two sides understanding the same word differently.
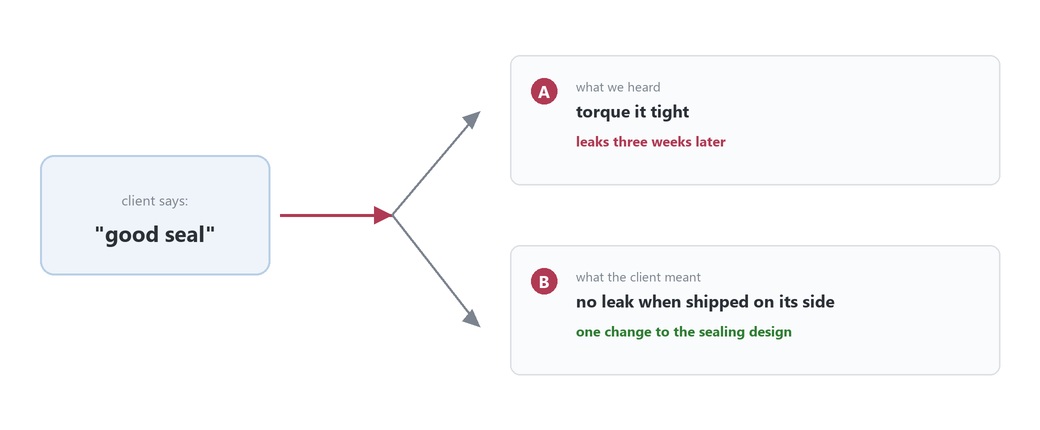
When a client says "good seal", they have a specific scenario in mind — the bottle lying on its side in a courier box for three days, a consumer squeezing it upside down, or a product sitting in a bathroom through repeated temperature and humidity swings.
When we hear "good seal", our first instinct is tightness — so we focus on cap torque. The torque is correct, the drawing looks fine, and the scenario the client was actually worried about was never covered. The result is leakage that only appears three weeks later.
The fix is unglamorous: replace the adjective with a scenario. Do not ask the client how good the seal needs to be. Ask how the bottle will be shipped and how the consumer will use it. Once the scenario is clear, the technical answer is usually obvious.
If you are preparing a first sample, three things are worth settling before tooling: the viscosity of the formula and whether it carries a high proportion of essential oils, the shipping method (side-laid or inverted), and the actual consumer use action. Once those three are fixed, the range of viable neck and sealing options narrows sharply.
品牌方在打样阶段最常见的一个误会,是以为改一个尺寸只是改一个数字。图纸上把瓶口直径从 18mm 改成 18.5mm,看起来只是半毫米的事 —— 但在生产端,这半毫米会同时牵动三件事。
第一,与内容物的接触面积变了。瓶口内壁的面积直接关系到料液与包材的接触量。对多数配方来说这点变化可以忽略,但对两类产品不能忽略:含高浓度精油的,以及需要长期存放的。接触面积变化会改变迁移与吸附的量,进而影响保质期测试的结论。
第二,灌装工位的对位精度变了。灌装嘴是按瓶口中心定位的。瓶口变大或变小时,灌装嘴与瓶口的相对位置会偏移,偏移量不一定大,但足以让灌装时的溅液或挂壁变多 —— 表现出来就是灌装量的波动变大。
第三,旋盖时的受力分布变了。瓶口尺寸变化会改变瓶盖与瓶口的接触带宽度。接触带宽了,同样的扭力分布更均匀;窄了,局部压强升高,容易压坏垫片,或者反过来拧不到位。这两者都会在几周后表现为渗漏。
所以真正的问题不是「这个尺寸能不能改」,而是「改了之后要复核什么」。我们内部的做法是:任何尺寸改动都要同步复核这三处,不只在图纸上确认,还要在灌装线上实际跑一遍。
再说密封结构本身。同样是「密封要好」,实现的路径有好几条,它们的成本、装配难度和适用场景各不相同。
最基础的是标准螺纹配平垫片。结构简单、成本最低,适合内容物黏度较高、不需要侧放运输太久的产品。
如果客户明确会侧放或倒置运输,就值得考虑加深密封槽。它的原理是让垫片在受压时有更多形变空间,贴合面更连续,代价是瓶口模具更复杂、单价会上去。
对精油类或低黏度产品,还有一种做法是内塞加外垫片:内塞先阻断流动路径,外垫片负责最终密封。双重结构的结果更稳定,但装配工序变多,而且内塞的材质必须与配方做过相容性确认。
这三条路没有哪条绝对更好,取决于你的配方、运输方式和成本空间。我们通常会建议客户在同一批样品里同时试两种结构,用同一批料液做对比,这样结论才可比。
最后这件事比技术更常出问题:双方对同一个词的理解不同。
「密封要好」这句话,客户说的时候心里想的是一个具体场景 —— 可能是瓶子在快递箱里侧放了三天,可能是消费者把瓶子倒过来挤,也可能是产品放在浴室里经历反复的温湿度变化。
而我们听到「密封要好」,第一反应往往是拧紧不松脱,于是把注意力放在旋盖扭力上。扭力做对了,图纸看起来没问题,但客户担心的那个场景根本没被覆盖 —— 结果就是侧放三周后才渗漏。
避免这件事的办法很朴素:把形容词换成场景。不要问客户「密封要做到什么程度」,而是问「这个瓶子会怎么运输、消费者会怎么用它」。场景问清楚了,技术方案几乎是自然浮现的。
如果你正在准备首次打样,有三件事值得在开模前定下来:内容物的黏度与是否含高比例精油、运输方式(是否侧放或倒置)、以及消费者实际的使用动作。这三项确定之后,瓶口结构与密封方案的选择范围会大幅收窄。
Related reading相關閱讀
Questions about this process?對這道工序有疑問?
Ask us and we will answer in writing, with the batch records to back it up.問我們,我們會以書面回覆,並附上批記錄。